
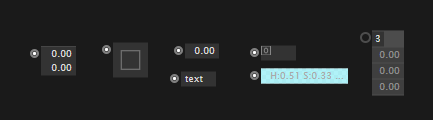
IOBoxes
Short for "Input/Output boxes", they allow you to input constant data into your program or output it for debugging or display purposes.
You typically create an IOBox by starting a link from an input or output pin and then using a Middleclick (or ALT + leftclick) to create the according IOBox. Alternatively you can create an IOBox by selecting one from the nodebrowser popping up when you right doubleclick in the patch.
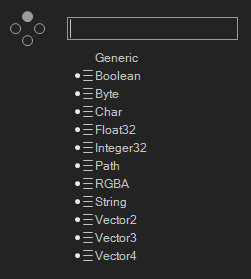
An IOBox exists for each primitive datatype and they all have some special features which you can learn about here:
Configuring IOBoxes
Configuring IOBoxes via their inspector works the same for all of them:
- Middleclick the IOBox
- or Rightclick its label and select
Configure.
Numbers
Number IOBoxes work the same for whole (integer32, byte, ...) and real (float32, ...) numbers:
- Doubleclick to enter a value via keyboard
Note
You can also enter math formulas like, e.g.: "1/3" that will be immediately be evaluated and fill the IOBox with the result.
For a signchange like "-1" you'll have to write "±1"!
- Right-drag up and down to change the value gradually
- hold SHIFT while dragging, to divide the step-size by 10
- hold CTRL while dragging, to divide the step-size by (another) 10
- hold ALT in combination with the above to multiply instead of divide the stepsize
- ALT + Rightclick to reset the value to its default
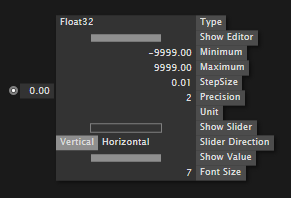
Via the inspector you can configure the IOBox:
- Choose minimum and maximum and stepsize that will be taken into account when right-draging the value
- Choose a display precision
- Choose to display a unit for the value. The unit has no effect on the value and is only good for display purposes
- Choose to show a horizontal or vertical slider
Vectors
For Vector IOBoxes you can foremost configure whether you want to view their individual components in a vertical or horizontal stack.
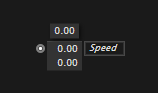
Also you can change all components at once by changing the value popping up above the IOBox when hovering it.
Booleans
A boolean IOBox has three different button modes:
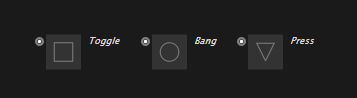
- Toggle: a rightclick toggles between TRUE and FALSE
- Bang: a rightclick makes it return TRUE for one frame, otherwise returns FALSE
- Press: returns TRUE as long as it is right-pressed, otherwise false
Strings
Changing values in string IOBoxes works as follows:
- Doubleclick to enter text via the keyboard
- While entering text press CTRLENTER to add a new line
- CTRL + Rightclick to open the file chooser dialog
- SHIFT + Rightclick to open the directory chooser dialog
Via the inspector you can configure the IOBox:
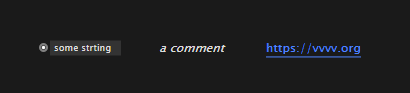
- Choose one of three string types:
- String: the default
- Comment: to put a comment in a patch
- Link: to put a link as comment in a patch that open in the browser on rightclick
- Choose to visualize non-printable characters (ie. those with an ascii code < 32)
Colors
Color IOBoxes let you enter colors in many different ways:
- Doubleclick to enter the name of a color via the keyboard
- Doubleclick to enter the values of a color in different formats:
- a string of type: "H:0.00 S:0.00 V:1.00 A:1.00" where each component (hue, saturation, value and alpha of the HSVA color model) is a value between 0 and 1
- a string of type: "R:0 G:255 B:0 A:255" where each component (red, green, blue and alpha of the RGBA color model) is a value between 0 and 255
- a string of type: "RRGGBBAA" where each of RR, GG, BB and AA are pairs of hexadecimal values from 0 to 255, eg for red specify: "FF0000FF"
Change colors via mouse interaction:
| Description | Action |
|---|---|
| Change brightness | Rightdrag up/down |
| Change hue | Rightdrag left/right |
| Change saturation | Ctrl + Rightdrag up/down |
| Change the alpha channel | Shift + Rightdrag up/down |
Paths
Path IOBoxes can be used to enter filenames or directories. By default they always assume you want to choose a filename!
Note
Path IOBoxes always store relative paths if possible but actually hide this fact from you! This will lead to confusion in the rare case that you actually want to specify an absolut path: While IOBox and tooltip will show the absolut path you entered, internally a relative path is stored. So if you really need to specify an absolut path, use a string IOBox followed by a ToPath [IO] node.
- Rightclick to open open the file chooser dialog
- SHIFT + Rightclick to open the directory chooser dialog
- Click the [O] icon to open the currently selected file with its associated application
- ALT + click the [O] icon to view the file/directory in windows explorer
Via the inspector you can configure the IOBox:
- Choose between File or Directory as path type which simply determines which dialog a rightclick on the IOBox will pop up
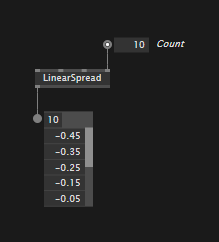
Collections
Collection IOBoxes work with all the above datatypes. Most often you'd create them automatically by starting a link from a pin that has a collection type (e.g. Spread, Sequence,...) and then middle-click to create the according IOBox automatically.
If you want to manually create a collection IOBox, first create a normal IOBox and then configure its type to be of eg. Spread<Float32>.
The number you see topleft in the IOBox specifies the number of elements in the collection and can be changed. By default a collection IOBox will display up to 5 elements. When the collection contains more items, a scrollbar will be shown.
Via the inspector you can configure the IOBox:
- The number of maximum visible entries
- Show/Hide the entry index
- Define whether the entries will be displayed as a vertical or horizontal stack
- Add/Remove entries